Tuesday, February 4, 2014

The Glory of Asphyxious!

Painting a Warmachine Lich Lord

by Randy
@coffeeswiller

Hello there!

I wanted to show off my latest project. If you have played either Warmachine or the Iron Kingdoms Roleplaying Game, you have heard of Cryx. For those who haven't, Cryx is an island nation of nightmares, where the dead walk and do the bidding of the world's largest dragon. The dragon, Toruk, has appointed twelve Lich Lords to carry out his bidding as governors and generals to conquer the world for him. The mini I painted is one of those Lich Lords, Asphyxious. Asphyxious just recently acquired his title by slaying his predecessor, Daemortus, whom he has made into a spear.


Pretty fearsome, eh? The model itself is pretty impressive. Not counting the plastic base, it has 12 pieces. I'm not covering assembly here, though you'll probably get a little of that incidentally. With a model like this, it makes the most sense to paint it in pieces. I painted the model with Formula P3 paints, the paint range by Privateer Press, makers of Warmachine.

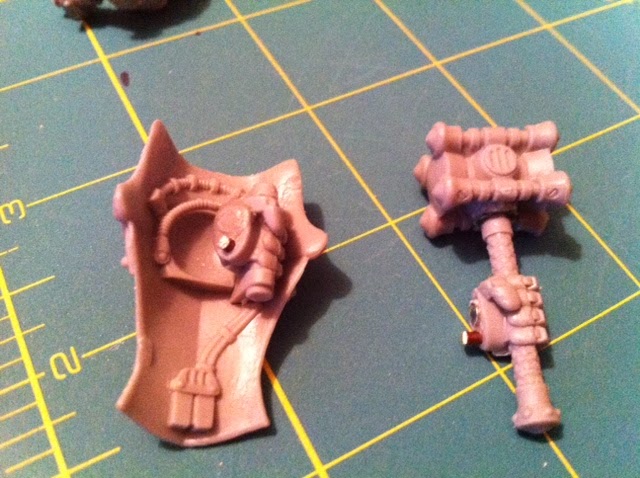
This pic shows me getting the model ready for priming. I have already washed the pieces, cleared mold lines and I have put together the upper and lower body, and the base and the stand piece for the base.Then I mount the remaining pieces to be primed with a spray primer. I used my hand drill to make small holes which double as places for pins when the model finally gets assembled.


Here it is after it has been primed in black and painting is underway. 


Here's the body. For his robes, I used Rucksack Tan mixed with Armor Wash. The green in the head socket, between the ribs and underneath the body is Necrotite Green. I went over the black metal with a little thinned Cryx Bane Base, then drybrushed Cold Steel. The soul cages hanging on the belt were done with Blighted Gold, highlighted with Rhulic Gold. 


Here's the base. I had already painted the base insert, not I have added the swirling souls and have painted them. Also, if you look closely, you can see a little metal pin in the top of the central swirly pillar. This corresponds to a drilled hole in the bottom of the lower body. This was done with Necrotite Green and Morrow White. 


Here's the 'backpack': the array of exhaust pipes coming from the back. Cryxians burn necrotite instead of coal,. and that burn with a green flame. The metals are the same as the body above, with most done with black drybrushed with Cold Steel, and the flares at the end of the pipes Blighted Gold highlighted with Rhulic Gold.


Here is the right hand & spear. Metals as above, with the blade being Cold Steel washed with Armor Wash. The eye was done in Morrow White, with the pupil Coal Black, and the edges done with thinned Murderous Magenta. 


And here he is... Lich Lord Asphyxious, in all his terrible glory! His skull was basecoated with Rucksack Tan, washed with Armor Wash and then highlighted with Morrow White. 


So... that's him! I finally got him together and painted, after having the model hiding in my unpainted pile for a couple years waiting for me to become a better painter. I'm very happy with the outcome, and maybe one day I'll field him in a battle, or plague the players in my upcoming Iron Kingdoms Roleplaying Game campaign with him. Any miniatures that you're particularly proud of? Let me know below! And also consider visiting my Instagram profile. You'll find quite a few miniatures on there!


Sunday, January 5, 2014

All 'Jacked Up!

Magnetizing The Cygnar Avenger - Centurion - Hammersmith Warjack Kit!

By Randy
@coffeeswiller

Hiya, folks! I some more miniature hobby stuff to talk about concerning one of my favorite games, Warmachine by Privateer Press. In a recent post I did on playing Warmachine on a budget, one thing that came up after a helpful comment by a reader was that using magnets to be able to quickly convert  one warjack or warbeast to another was one way to save money. I had been itching to try this for months! I finally got a warjack kit, and wanted to share my first attempt at building a model this way. So here's the model:


And here it is all laid out to show the parts:


This kit allows you to build three different warjacks: the Centurion (with spear & shield), the Hammersmith (with 2 matching hammers) and the Avenger (with a sword & a seimic cannon arm). So planning ahead, we primarily need to have the ability to swap out the arms. Each warjack also has a different head, and while this isn't necessary, we'll magnetize those, too. Finally, there are two sets of shoulder pads. It is perhaps completely frivolous, but I'll magnetize those, too.

Here are my tools:


There shouldn't be anything surprising there. From left to right, we have magnets, brass rod, a file for removing mold lines, liquid green stuff, superglue, a pin vise/drill, an X-acto knife and tweezers. Not pictured is epoxy putty (I prefer ProCreate putty) and a Sharpie. Here are the magnets (3mm x 1mm neodymium):


The first step after planning is to drill holes for the magnets. Many model builders will already be doing a bit of this to add pins or brass rods to support heavier parts of models. What I am going to do here is make holes large enough to set in a magnet.


I used epoxy putty and superglue to set them in.


That one is the right arm. That one I pinned to the shoulder, since all the right arm does is hold a weapon in all the possible configurations. Here's one of the weapons (the sword for the Avenger). Each of the right arm weapons has the hand molded to them, and here is what an inset magnet looks like on one of them.


The left arm was a little more tricky. First of all, there are two separate arms: one is a cannon, and the other an arm like the right that has two different weapon combos (a hammer and a shield). The arm and shield combination is fairly heavy, and one magnet (at least of the size I have) will not suffice to hold the whole assembly. So here's what I did
:
I drilled a hole for a brass rod, and I set in one of the magnets slightly farther back. I tested positions for where to place them and this seemed the best.  Here are the two arms:


And here is wrist of the left forearm:


The red dot notes where the magnet is (it is covered by putty, which matches the grey of the plastic) and there is also a hole for a brass peg. And here are the shield and the hammer hands:


Each has an inset magnet on the top and a brass peg below. The hammer hand didn't really need it, but I figured it wouldn't hurt. And here is the finished kit, laid out in all its separate pieces:


And here are each of the warjacks it makes:

The Avenger!
The Centurion!

The Hammersmith!
Update! I made a brief YouTube video showing how this works together. The video isn't the greatest but it should give you an idea of how it works:


This was a fun kit to build! It will, of course, be painted and set on a finished base. But right now, my painting queue is pretty large. One observation I will share that you should note for your magnetized projects is that magnets have positive and negative sides, and your pieces will need to match up. I recommend using a Sharpie to place a dot on a magnet, and be sure to test before gluing. That's it!

Do you have any model projects that you are particularly proud of? Tell us below!